prep time: 30 min | bake time: 50 min | total time: 3 hrs
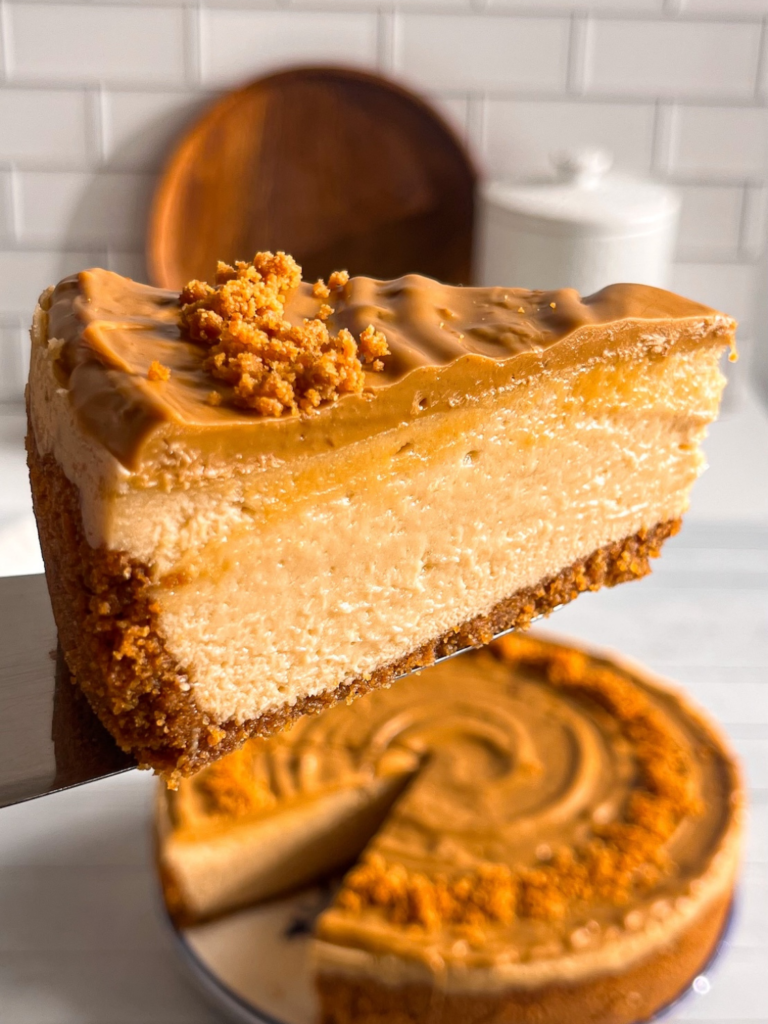
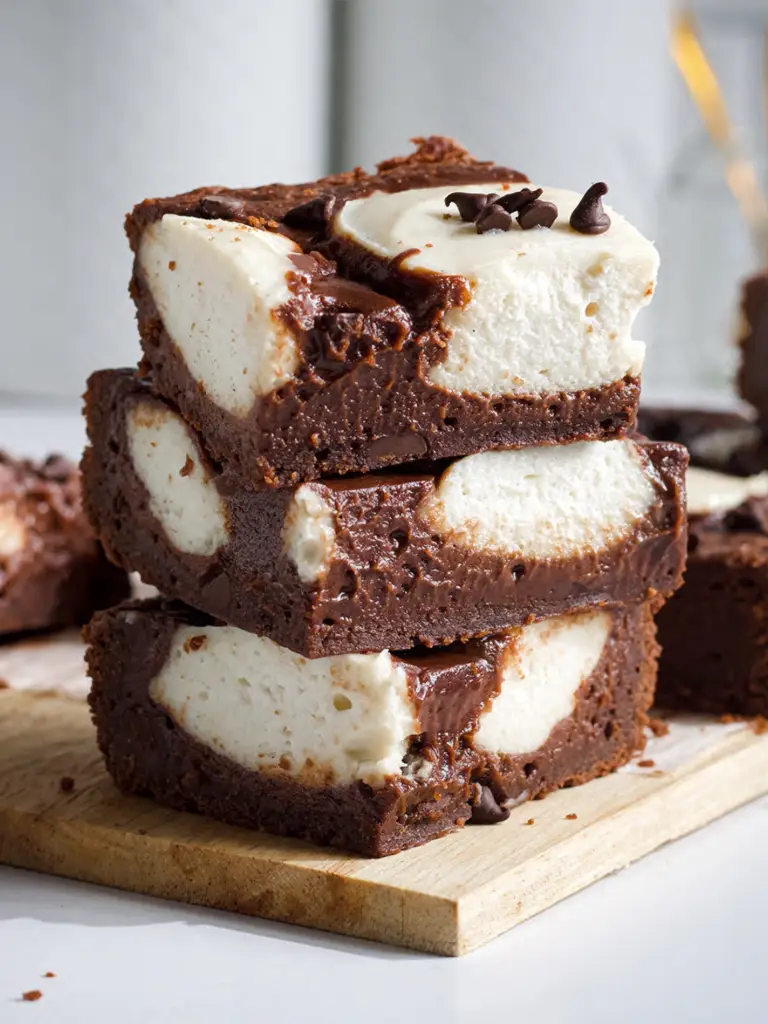
Creamy like a classic New York cheesecake but with a fresh, fruity twist, this eggless Strawberries and Cream Cheesecake layers real strawberries and whipped cream over a rich, velvety base. Easy to make, and seriously hard to stop at one slice.
No-Egg Strawberries and Cream Cheesecake for Sweet Summer Days
This Strawberries and Cream Cheesecake is completely eggless, but you’d never guess it from how rich, creamy, and packed with real strawberry flavor it is. It may look fancy, but it’s secretly simple an eggless, ultra-creamy cheesecake topped with whipped cream and fresh strawberries. Dairy-free options are listed below!
Traditional cheesecakes rely on eggs to bind the filling and create that dense yet-creamy texture. In this eggless version, a mix of cream cheese, cornstarch, and heavy cream does the heavy lifting. The cornstarch thickens and stabilizes the batter, helping it set beautifully!
And because there are no eggs, there’s less risk of overbaking or curdling, which makes this recipe more forgiving, especially for beginner bakers. The result? A smooth, sliceable cheesecake with all the richness you’d expect, minus the fuss.
Equipment
8-inch (20cm) or 9-inch Springform Pan
Ingredients for Strawberries and Cream Cheesecake
Biscuit Base
Biscuits (Graham crackers, Digestive biscuits, or Ginger biscuits): The biscuit crust forms the base of this eggless cheesecake, adding texture and subtle sweetness. Graham crackers offer the classic flavor, digestives add maltiness, and ginger biscuits bring a warm, spiced note that pairs beautifully with the strawberry topping.
Butter (Melted): Melted butter acts as the binder, holding the crushed biscuit crumbs together as it cools and solidifies. When chilled, it creates a firm, sliceable crust that supports the weight of the filling.
Strawberry Cheesecake Layer and Topping
Fresh Strawberries (Diced and Pureed): Strawberries are the star of this layer, delivering bright, natural sweetness and that deep berry flavor. Using fresh strawberries gives the topping a fresher, more vibrant taste compared to jam or frozen alternatives.
Cane Sugar or Castor Sugar: Sugar does more than just sweeten. It helps break down the strawberries slightly when heated, releasing more juice and enhancing the natural fruit flavor. Castor sugar (which is finer than regular granulated sugar) or Cane sugar works just as well.
Cornstarch: Cornstarch is the thickening agent in this recipe. When combined with water and heated, it forms a gel-like texture that gives the strawberry layer its smooth, jammy consistency without eggs or gelatin.
Water (Mixed with Cornstarch): Water is used to dissolve the cornstarch before it’s added to the hot fruit mixture. This step prevents lumps and allows the starch to activate evenly when heated.
Lemon Juice (Mixed with Cornstarch): Lemon juice adds brightness and a touch of acidity, which helps balance the sweetness of the strawberries and sugar. It also enhances the natural color of the strawberries, keeping the topping vivid instead of dull.
Vanilla Cheesecake Layer
Cream Cheese (Room Temperature): Cream cheese is the foundation of your cheesecake filling, At room temperature, it blends more smoothly with the other ingredients, preventing lumps and ensuring a silky finish.
Plain Yogurt (Room Temperature): Yogurt adds moisture and tang, lightening the overall texture of the cheesecake.
Cane Sugar or Castor Sugar: . Castor sugar dissolves quickly, while cane sugar offers a deeper, slightly molasses-like note. Either one works just make sure it’s fully blended to avoid graininess.
Vanilla Extract: Vanilla adds depth and warmth to the flavor, rounding out the tang of the yogurt and cream cheese.
Salt: It balances the sweetness, brings out the richness of the dairy, and adds complexity. Even in sweet recipes, salt is what makes the flavors pop.
Whipping Cream (Room Temperature): Its high fat content helps create a creamy, luxurious texture without needing eggs or gelatin. Using it at room temperature prevents curdling!
Cornstarch: Cornstarch is the key stabilizer in this eggless cheesecake. It thickens the mixture by absorbing moisture and forming a soft gel as it chills.
Whipped Cream Topping
Whipping Cream (Cold): Cold whipping cream adds a light, fluffy topping thanks to its high fat content. Whipping it cold ensures volume and stability, balancing the rich cheesecake below.
Powdered Sugar (or Icing Sugar): It dissolves instantly, Unlike granulated sugar, which keeps the texture smooth and lump-free. The small amount of cornstarch found in most commercial powdered sugars also gives the cream a bit more structure, helping it hold its shape longer after piping or spreading.
Greek Yogurt (or Sour Cream): Greek yogurt or sour cream adds a creamy body to the topping. It provides stability and richness to the whipped cream a more velvety mouthfeel.
Vanilla Extract: Vanilla extract ties everything together, adding depth and that unmistakable bakery-style flavor.
How Can I Make This Cheesecake Dairy-Free?
Yes, you can easily make this cheesecake dairy-free with a few simple substitutions. Here’s how:
Dairy-Free Alternatives
Cream Cheese: Replace traditional cream cheese with a dairy-free option such as Violife Cream Cheese or Tofutti Better Than Cream Cheese. Both are widely used and perform well in baked desserts.
Yogurt: Use an unsweetened, plain plant-based yogurt made from coconut, almond, or soy. These options provide similar texture and acidity to dairy yogurt.
Whipping Cream (for the filling): Swap in a plant-based whipping cream, such as Silk Dairy-Free Heavy Whipping Cream or Country Crock Plant Cream, which are designed for cooking and baking.
Whipped Cream (for topping): You can either (a) Chill and whip the solid part of a can of full-fat coconut milk or coconut cream,(b) Use a store-bought non-dairy whipped topping like So Delicious CocoWhip, or (c) Whip a cold dairy-free cream alternative like Silk or Country Crock Plant Cream until fluffy.
How to Preheat Your Oven for Cheesecake Baking
Proper preheating is essential for baking a cheesecake evenly and achieving the right texture. The temperature and preheat time can vary depending on the type of oven you’re using. Here’s a simple guide:
Convection Ovens & Built-in Wall Ovens
Convection Oven: Set the oven to 300°F (150°C). Convection ovens use a fan to circulate hot air, which bakes more efficiently. That’s why you should reduce the temperature by about 25°F (14°C) compared to a conventional oven. Preheat for 10–15 minutes or until the oven reaches the set temperature.
Built-in Wall Oven (Electric or Gas): Set the temperature to 325°F (160°C). These ovens bake more evenly when fully preheated, so allow 15 minutes for the temperature to stabilize.
Electric Fan Ovens & Range Cookers
Electric Fan Oven: Reduce the temperature to 140°C (285°F), since the fan speeds up cooking. Preheat for about 10 minutes.
Range Cooker (Electric or Gas): Preheat to 160°C (320°F). These ovens may take a bit longer to warm up evenly, so allow at least 15 minutes of preheating.
OTGs & Convection Microwaves
OTG (Oven Toaster Griller): Set to 160°C (320°F) and preheat for 15 minutes. OTGs can take longer to heat evenly, so be sure to give them enough time.
Convection Microwave Oven: Set to 150°C (300°F) and preheat for around 10 minutes. These ovens heat up quickly but still need time to reach an even baking temperature.
Pro Tip: Always wait until your oven reaches the full preheat temperature before placing your cheesecake inside. This ensures consistent baking from the start and helps avoid cracks or uneven texture.
Did You Know? There Are Two Common Ways to Bake a Cheesecake
Baking cheesecake properly helps achieve a smooth, creamy texture and prevents cracks on the surface. Here are two reliable methods you can use:
Water Bath Method (Bain-Marie)
This classic technique involves placing your cheesecake pan inside a larger pan filled with hot water to create gentle, even heat.
How to do it:
Wrap the outside of your springform pan tightly in foil to prevent water from leaking in.
Set the wrapped pan into a large roasting pan or deep baking tray.
Carefully pour hot water into the outer pan until it reaches halfway up the sides of the springform pan.
Bake the cheesecake until the edges are set and the center still has a slight jiggle.
Turn off the oven and let the cheesecake cool gradually inside the water bath to avoid cracks caused by sudden temperature changes.
Steam Tray Method
This is a simpler alternative that still uses moisture but doesn’t require placing the cheesecake directly in water.
How to do it:
Place a large, oven-safe dish filled with hot water on the lower rack of your oven. This will act as a steam tray.
Position the cheesecake on the middle rack above the steam tray.
Bake as directed. After baking, turn off the oven and leave the door slightly open.
Let the cheesecake cool inside the oven for about an hour. This slow cooling helps reduce the risk of cracks.
Both methods help maintain a smooth texture and prevent surface cracking by controlling moisture and temperature during baking and cooling.
How to Make Strawberries and Cream Cheesecake Without Eggs
Biscuit Base
Prepare an 8-inch (20 cm) springform pan by wrapping the outside with aluminum foil to create a tight seal. This helps prevent any leakage during chilling or if using a water bath in other recipes.
Using a food processor, finely crush the biscuits until they resemble coarse sand. Combine crushed biscuits with melted butter and mix until the texture looks like wet sand.
Pour the mixture into the prepared pan and press it firmly into an even ¼-inch layer across the base and all the way up the sides. You can use the bottom of a glass or the back of a spoon to get a smooth, compact finish.
Once the crust is shaped, place the pan in the refrigerator for about 30 minutes to allow it to set.
Strawberry Compote
Wash, hull, and half the strawberries. Place them in a saucepan with the sugar and let them sit for about 5 minutes to soften and release their juices. Cook the mixture over low to medium heat, stirring occasionally, until it begins to boil gently.
Mix cornstarch with water and lemon juice to form a slurry. Stir it into the strawberry mixture and cook for 1 minute, until thick and glossy. Remove from heat.
Transfer the thickened strawberry mixture to a shallow bowl or tray to cool completely.Refrigerate for about 1 hour.
After chilling, blend about 3/4 of the mixture with 2tsp of cornstarch in a food processor until smooth this will be used for the cheesecake filling. Store the remaining unblended portion in the fridge for the topping.
Vanilla Cheesecake Layer
Preheat the oven to 160°C (320°F). In a large mixing bowl, combine the cream cheese and plain yogurt. Using an electric hand mixer or a stand mixer fitted with a paddle attachment, beat until the mixture is smooth and creamy with no lumps.
Add sugar, vanilla extract, and salt, and continue mixing until fully incorporated. Pour in the whipping cream and add the cornstarch, then mix again until the batter is completely smooth.
Pour half of the cheesecake batter into the prepared crust and spread it into an even layer. Combine the remaining cheesecake batter with the prepared strawberry pureed mixture. Mix until smooth.
Pour the strawberry cheesecake layer over the plain layer, spreading gently to avoid mixing the layers. If desired, swirl a few spoonfuls of reserved strawberry topping over the surface to create a marbled effect.
Place the pan in a water bath (or on a steam tray) and bake for 50 to 55 minutes, or until the edges are set and slightly puffed, while the center remains slightly jiggly.
Turn off the oven, crack the door open slightly, and let the cheesecake cool inside for 45 minutes. Then remove it from the oven and allow it to cool completely at room temperature. Once cooled, refrigerate the cheesecake for 4 to 5 hours, or until fully set and chilled through.
Whipped Cream Topping
For best results, place your mixing bowl and beaters (or the whisk attachment) in the refrigerator or freezer for 10 to 15 minutes before starting.
Once chilled, pour the cold whipping cream into the bowl and beat with an electric mixer on medium speed until it begins to thicken. Add the powdered sugar, Greek yogurt (or sour cream), and vanilla extract.
Continue beating on medium-high speed until soft to medium peaks form—the cream should be light, fluffy, and just firm enough to hold its shape without becoming stiff.
Use the whipped topping immediately to decorate the cheesecake, or store it in the refrigerator until ready to use.
How to Assemble the Strawberries and Cream Cheesecake
After chilling the cheesecake for at least 4–5 hours (or overnight), carefully transfer it to a serving plate. Spoon the whipped cream on top and gently spread it around the edge to form a thick ring, creating a shallow well in the center. Fill the well with the chilled strawberry topping and spread it gently.
Garnish with fresh strawberries, halved or whole, for an extra touch. Chill for 15–20 minutes to set the topping. Store leftovers in an airtight container in the fridge for up to 3–4 days.
Yes, it’s completely eggless. The structure comes from cream cheese, yogurt, and cornstarch, making it an ideal choice for anyone avoiding eggs due to allergies, diet, or preference.
Yes, frozen strawberries work well. Just be sure to thaw them fully and drain any excess liquid. You may need to simmer the mixture a bit longer to account for the added moisture.
Yogurt adds creaminess and a mild tang that balances the sweetness. It also helps with texture and structure. You can substitute it with sour cream or a dairy-free yogurt alternative if preferred.
A water bath or steam tray is recommended. It promotes gentle, even baking and helps prevent cracks. If you’d rather not use one, placing a separate pan of hot water on the lower oven rack can still create steam and reduce temperature fluctuations.
Cracks are usually the result of overbaking, sudden temperature changes, or overmixing. To avoid this, bake with steam, don’t overmix the batter, and allow the cheesecake to cool gradually in the oven with the door slightly open.
The cheesecake keeps well for 4 to 5 days when stored in an airtight container in the refrigerator. For best texture and flavor, enjoy the whipped topping within the first 1 to 2 days.
Yes, but it’s best to freeze the cheesecake without the whipped cream and fresh fruit. Wrap it tightly and freeze for up to 1 month. Thaw in the refrigerator overnight before decorating and serving.
Baked This Strawberries and Cream Cheesecake? Don’t Keep It a Secret!
There’s nothing quite like that dreamy combo of sweet strawberries and creamy, tangy cheesecake—especially when it’s wrapped in a vanilla-scented, melt-in-your-mouth bite. Whether you made it to impress at a party, treat yourself on a quiet weekend, or just because you love strawberries as much as I do, I hope it brought some joy to your table.
If you snapped a pic, I’d love to see it! Tag me @pastrybysaloni so I can check out your gorgeous bake. It always makes my day to see your creations come to life in your kitchens.
And if you caught yourself sneaking just one more slice, don’t even worry—you’re not alone. Keep the sweet streak going with more easy bakes that deliver big flavor:
Want to bake confidently—without stressing over eggs or dairy? My cookbook Vegan Baking Made Simple is filled with recipes that are every bit as luscious as the originals (maybe better). You can grab your copy on Amazon right HERE.
4 from 1 vote
Strawberries and Cream Cheesecake
Creamy, fruity, and eggless, this Strawberries and Cream Cheesecake is an easy, show-stopping dessert made with real strawberries and whipped cream.
300gFresh Strawberries, washed, hulled & cut in half
60gCane Sugaror Castor Sugar
24gCorn Starch
2 tbspWater (mixed with cornstarch)
1tbspLemon Juice (mixed with corn starch)
Vanilla Cheesecake Layer
500gCream Cheese*, at room temperature; see notes
160gPlain Yogurt*, at room temperature; see notes
200gCane Sugaror Castor Sugar
1tbspVanilla extract
120mlWhipping Cream*, at room temperature; see notes
35gCornstarch
2tsp Cornstarchto be mixed with strawberry mixture
Whipped Cream Topping
150mlWhipping Cream,cold
45gPowdered Sugar, or icing sugar
2 tbspGreek Yogurt, or Sour Cream*see notes
2tsp Vanilla Extract
Instructions
How to Make the Biscuit Base
Line an 8-inch (20 cm) or 9-inch springform pan with baking paper and wrap the outside with aluminum foil to create a tight seal. This helps prevent any leakage during chilling or if using a water bath to bake the cheesecake.
Using a food processor, crush the biscuits and combine with melted butter. Mix until the texture looks like wet sand.
Pour the mixture into the prepared pan. Press it firmly into an even ¼-inch layer across the base and all the way up the sides.
Once the crust is shaped, place the pan in the refrigerator for about 30 minutes to allow it to set.
How to Make the Strawberry Compote
Cut the strawberries in half. Place them in a saucepan with sugar and let them sit for about 5 minutes without heat to soften and release their juices. Cook the mixture over low to medium heat, stirring occasionally, until it begins to boil gently.
In a bowl, mix cornstarch with water and lemon juice to create a smooth slurry. Slowly pour in the slurry. Continue cooking for about 1 minute, or until the mixture thickens to a glossy consistency.Avoid overcooking the strawberries. Remove from the heat.
Transfer the thickened strawberry mixture to a shallow bowl or tray to cool completely in refrigerate for about 1 hour or in freezer to speed up the process.
Blend ¾ of the chilled strawberry mix with 2 tsps of corn starch in a food processor until smooth, this will be used for the strawberry cheesecake layer. Store the remaining in the fridge for the topping.
How to Make the Vanilla Cheesecake Layer
Preheat the oven to 160°C (320°F). In a large mixing bowl, combine cream cheese and plain yogurt. Using an electric hand mixer or a stand mixer fitted with a paddle attachment, beat until the mixture is smooth and creamy with no lumps.
Add sugar and vanilla extract continue mixing until fully incorporated. Pour whipping cream and cornstarch, then mix again until the batter is completely smooth.
Pour half of the cheesecake batter into the prepared crust and spread evenly. Combine the remaining cheesecake batter with prepared strawberry pureed mixture, reserve a few spoons for a marbled topping(optional). Mix until it is smooth.
Gently pour the strawberry layer over the plain layer and swirl in a bit of strawberry topping for a marbled effect.
Place the pan in a water bath (or place a tray with boiling water on bottom rack to create steam). Bake for 50 to 55 minutes, or until the edges are set and slightly puffed, while the center remains slightly jiggly.
Turn off the oven, crack the door open slightly, and let the cheesecake cool inside for 45 minutes. Then remove it from the oven and Refrigerate the cheesecake for 4 to 5 hours, or until fully set and chilled through.
How to Make the Whipped Cream Topping
For best results, place your mixing bowl and the whisk attachment in the refrigerator or freezer for 10 to 15 minutes before starting.
Once chilled, beat cold whipping cream until it thickens, then add powdered sugar, Greek yogurt (or sour cream), and vanilla.
Continue beating on medium-high speed until medium peaks form.
Use the whipped topping immediately to decorate the cheesecake, or store it in the refrigerator until ready to use.
How to Assemble the Strawberries and Cream Cheesecake
After chilling the cheesecake for at least 4 to 5 hours or preferably overnight, remove it from the refrigerator and carefully transfer it to a serving plate or cake stand.
Using a spoon, swirl the whipped cream topping on the cheesecake to form a thick ring and create a shallow well in the center, perfect for holding the strawberry topping.
Spoon the chilled strawberry topping into the center, spreading gently. Add a few halved fresh strawberries on top for garnish.
Place the finished cheesecake back in the refrigerator for 15 to 20 minutes to allow the topping to firm up slightly before slicing. For clean, professional-looking slices, use a sharp knife dipped in hot water and wiped clean between cuts. Store any leftovers in an airtight container in the refrigerator for up to 3 to 4 days.
Notes
Cups vs. Scale: The U.S. customary cup is a convenient but approximate way to measure ingredients, as it can vary slightly depending on how ingredients are packed. For more consistent and accurate results, especially in baking, we recommend using a digital kitchen scale to weigh ingredients in grams.
Teaspoons and Tablespoons: When measuring small quantities, always use proper measuring spoons (marked as teaspoons/tablespoons) rather than regular eating utensils to ensure accuracy.
Butter: You may use dairy-free salted butter sticks or any salted butter you prefer.
Whipping Cream: For vegan or dairy-free recipes, choose an unsweetened, dairy-free whipping cream such as Califia farm, Country Crock Plant Cream. Otherwise, any full-fat whipping cream will work.
Cream Cheese: For vegan or dairy-free options, use plain, dairy-free cream cheese such as Tofutti or Violife Vegan Cream Cheese. Alternatively, use any plain, full-fat cream cheese you prefer.
Plain Yogurt or Sour Cream: Choose unsweetened, dairy-free yogurt or dairy-free sour cream for vegan or dairy-free recipes, or substitute with plain Greek yogurt or traditional sour cream as desired.
Meet Saloni
I’m a former pastry chef with a love for breads, cakes and everything in between! My recipes are easy to follow, egg free and are designed to be shared with others!
love the strawberry flavour. I would make the base thicker next time because this one almost broke.
Im not sure why it releases some liquid which accumulated by the crust. I felt like the smaller edge was too liquidiy.
would you suggest I bake for longer so that it holds better? Or add more corn starch?
So glad you liked it! My test batches held beautifully.Make sure the strawberry mix is properly thickened when cooking. If you had liquid near the crust, try a bit more cornstarch only to strawberry cheesecake layer and bake for longer. And yes, a thicker base should help too.


2 Responses
Hey Saloni
tried this recipe!
love the strawberry flavour. I would make the base thicker next time because this one almost broke.
Im not sure why it releases some liquid which accumulated by the crust. I felt like the smaller edge was too liquidiy.
would you suggest I bake for longer so that it holds better? Or add more corn starch?
Hi Priyanka,
So glad you liked it! My test batches held beautifully.Make sure the strawberry mix is properly thickened when cooking. If you had liquid near the crust, try a bit more cornstarch only to strawberry cheesecake layer and bake for longer. And yes, a thicker base should help too.