You bet! While vegetable oil is the golden ticket here, feel free to get a little adventurous with avocado oil or sunflower oil. Both will work their magic in the batter, giving a slightly different flavor profile. Just keep in mind, the texture or taste might shift a tiny bit, but hey, variety is the spice of life, right?


38 Responses
It was super moist and very yummy. Thank you for sharing your lovely recipe.
Thank you Heena, I appreciate it!
How tall will the 8 inch layers be – as @ ingredient weight of 580 g, that is normally expect of a single layer ± 3 cm tall.
Does it mean if I want a regular height cake then I must either do 3 or 4 thin layers ?
Hi Andre
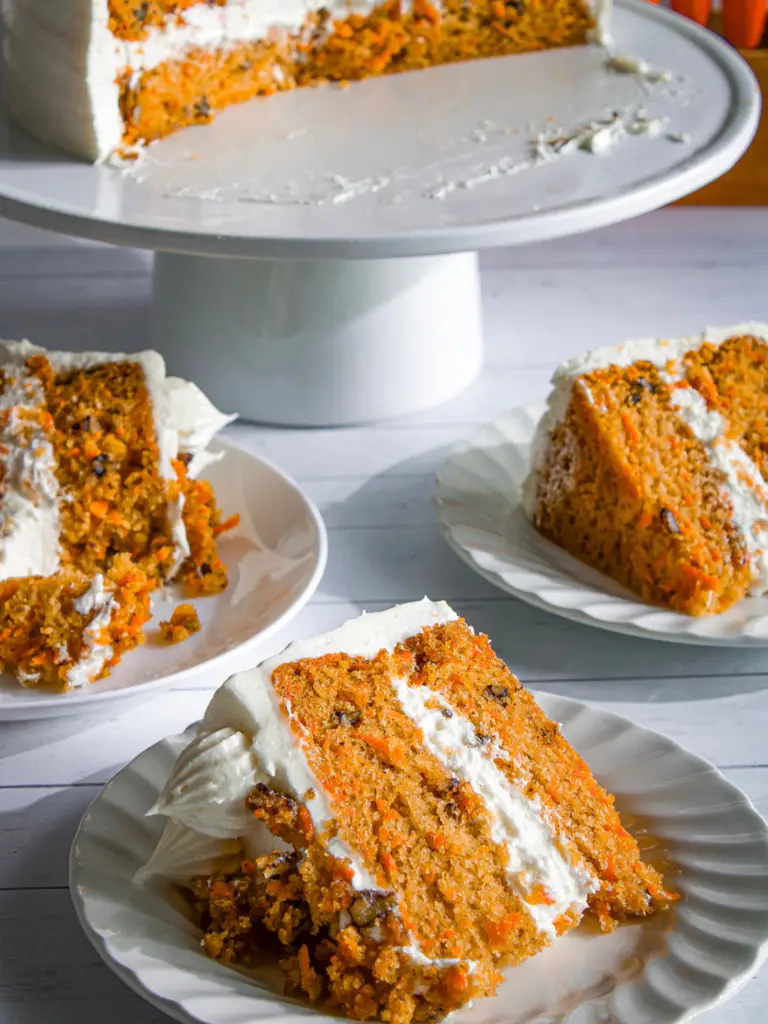
The cake as written isn’t very tall — each 8-inch layer will be about 1.5inches(4cm)high.
If you’d like a taller cake, I suggest making 1½ times the recipe, and increasing the frosting as well (you may even want to double it for a taller cake).
Also, my cake recipes are usually a bit lighter on frosting, so if you prefer a more generously frosted finish, definitely scale that up. Happy Baking!
The cake recipe is very nice everyone loved the same.I have few questions
1.How to convert the cake to butter scotch flavor
2.If I make butter scotch flavor do I need to add butter scotch essence in sponge.
3.do I need to frost with butter cream or non diary cream
it would be a great help if you could share any video for butterscotch cake
Hi
Thank you so much, I’m glad everyone loved the cake!
Here are the answers to your questions:
-To convert this cake to butterscotch flavor, keep the same sponge base and add butterscotch elements like butterscotch sauce and praline for flavor.
-You don’t need to add butterscotch essence to the sponge if you’re using a good-quality butterscotch sauce and praline. Essence is optional and should be used very lightly if you prefer.
-You can frost the cake with either buttercream or non-dairy whipping cream—choose based on your preference and shelf-life needs.
I don’t have a dedicated butterscotch cake video at the moment, but you can use this base recipe and finish it with butterscotch frosting and filling for great results.
Saloni ma’am recipes are very easy to make and are so tempting that you can’t wait to start making.
Thank you so much!
Hi 👋🏽
My son loves your recipe cupcakes, thank you so sons much!!!🎉🧁
Thank you so much!
Hi, thank you for the recipe! ☺️
I baked this today for my daughter’s birthday this weekend. Unfortunately it did not yield the quantities stated. I did 2x thinking I would get 4 8” layers but I only got 2 😢. It did bake beautifully though and feels very light and moist.
Hi Dan,
Thanks so much for trying the recipe 😊 I didn’t make the layers very thick, so that might be why the yield was different. Glad it baked up nicely though, hope your daughter had a wonderful birthday!
Hey saloni. From nigeria pls i dont really understand grams can u combine the measurement using cups or mls thank you looking forward to ur response
Hello
Thank you for your question! On the recipe card, you’ll find a toggle to switch between US cups and gram measurements. For baking purposes, grams and mls are equivalent for all ingredients.
Hi Saloni,
I have tried the brownie recipe and it came out very well . Thank you for the wonderful recipes you post. i would like to try this recipe too but can I stack the cakes for a 2 or 3 tier cakes ? And also can I soak the cake with sugar syrup , will it become soggy?
Hi
I’m so glad you enjoyed the brownie recipe thank you for the kind words! Yes, you can stack this cake for a 2 or 3-tier setup. Soaking with sugar syrup is optional; just use a light hand so it doesn’t get soggy. You can make the layers 1–2 days ahead wrap them well in plastic and freeze. It actually helps with easier stacking.
Hi Saloni,
If I want to make 2 layer 10inch cake, will 2X recipe be enough? what do you recommend?
Hi Bhavi,
Yes 2x recipe should be enough to make 2layer 10-inch cake.
Hi, what is 1x,2x,3x? Will 1x ingredients can make 8’’ 2 layer cake right?
Hi Priya,
Yes that is correct. 1x will make 8” 2 layers or 6” 3 layers and 2x will make 8” 4 layers and so on.
Hello
I’ve tried your recipes and they are amazing.
I wanted to ask what if I just want to bake just the cake without any frosting?
Do I need to add sugar and will I be able to bake in a single 8 inch cake pan ?
Hi Yamini,
Thank you so much—I’m really glad you’re enjoying the recipes!😊
Yes, you can definitely bake the cake without any frosting.Just be sure to still include the sugar in the batter—it helps balance the flavor even without the frosting. If you’re baking just a single layer in an 8-inch pan, you can cut the recipe in half. That should give you the perfect amount of batter for one layer without overflowing.Just keep an eye on the baking time, it may be slightly shorter, so do a toothpick test around the 20–25 minute mark.
Hello!
I absolutely love using your chocolate custard cake recipe! It’s an absolute gem of a cake which I’ve baked for my family a few times now and is easily becoming a most requested recipe.
With this vanilla cake, will the recipe still work if I was to add Oreos to it for a cookies and cream twist? (I wonder if they would just sink to the bottom) Would I also then have to leave out some of the sugar to avoid making it overly sweet?
Thank you so much for your help! 🙏🏾
D.
Hi Devi,
So glad you love the chocolate custard cake—thank you! 😊
Yes, you can definitely add Oreos chunks to the vanilla cake for a cookies and cream version. Just chop them up and press the chunks into the batter after you divide it into the cake pans. The cake isn’t too sweet on its own, so you likely won’t need to adjust the sugar but you can slightly reduce in the frosting it if you prefer.
Can’t wait to hear how it turns out!
– Saloni M.
It seems like the cake recipe only makes one cake? Do you need to double the recipe?
Nicole,
This recipe will make two layers of 8inch sized cake tins, if you double the recipe then it will yield four layers.
I made this for my boyfriend who is allergic to eggs and has never had a birthday cake. This was the first thing I have ever baked on my own, and it turned out beautifully! So happy with this recipe!
Hi Lauren
Thank you so much for the feedback.I hope you try many more recipes for him.
made a rainbow cake with this recipe for my mom’s birthday and everybody loved it! it was such a hit! thank you so much for such an easy yet delicious recipe 🙂
That’s so wonderful to hear! I’m so glad the cake was a hit and that your mom had a special birthday! 🎉 Thanks for trying the recipe and for the kind words — you totally made my day!
Hello!
I would love to make this and want to know if I can subsititue 2/3 cup sugar with 1/3 cup honey? I try not to bake for it granulated sugar and only use refined free sugar as honey in baking. Please let me know if this works if I can use honey how much I would I use? I appreciate all the time and effort and hard work you put into your recipes! They are amazing! Thanks!
Hi Deanyah
Hi there! Thanks so much for the kind words — I really appreciate it! 😊 I personally use cane sugar in this recipe since it’s a bit less processed than regular white sugar, but I haven’t tried baking it with honey yet. If you do give it a go, I’d love to hear how it turns out! Typically, when substituting honey for sugar, you can use about 1/2 to 2/3 the amount of honey (so around 1/3 to 1/2 cup honey for 2/3 cup sugar), and you might want to reduce the liquid in the recipe slightly and lower the oven temp by 25°F since honey browns faster. Hope that helps, and happy baking!
very nice recipe made this cake today for birthday girl.We thoroughly enjoyed
Thank you Sabari!
For a bento cake, should I half the recipe ?
Hi Anki
yes, you can half the recipe for a 6-inch cake.
Hi Saloni, I have tried this recipe twice, but it sank in the middle on both the occasions. kindly let me know what may be the reason.
Hi!
Thank you for trying the recipe and for your feedback. I’m sorry to hear the cake sank in the middle—there could be a few reasons for this. It often happens if the cake is underbaked, if the oven door was opened too early. Make sure to check your oven temperature with an oven thermometer, and try not to open the door until it’s mostly baked.